29. Two Pilot Freestyle
This Fly Screen lets you make selections for two pilots to fly around – freestyle.
To reach this window, click Two Pilot Freestyle from the Main Menu.
Fly Screen Selections
As shown in the image below, each pilot makes selections for the aircraft, takeoff method, and USB interface. Making the aircraft selection will automatically select the proper transmitter. Effectively, these selections follow those of the Single Pilot Freestyle setup page. (One difference is that the second pilot only has options for ground takeoff and hand launch. SeligSIM allows towline physics calculations only for the first pilot.)

Fly Screen: Two Pilot Freestyle.
Screen Settings Selection
To always see both aircraft while flying, click on Use Split Screen.
To change between horizontal and vertical split screen, click at top on Options where you can make your Split Screen Format selection (see Options | Video).
Transmitter Selections
While each aircraft requires a controller, there are a few options for doing that.
The first is to have two controllers plugged into your computer and select a different USB interface for each pilot. Any interface can be selected for either pilot, whether a controller mapped in the Mapping window (“Mapped - <device>”), a transmitter’s own USB name, or an FS One interface. To map a second controller, pick it in the Mapping window’s dropdown and map it the same way as the first. Each gets its own “Mapped - <device>” entry.
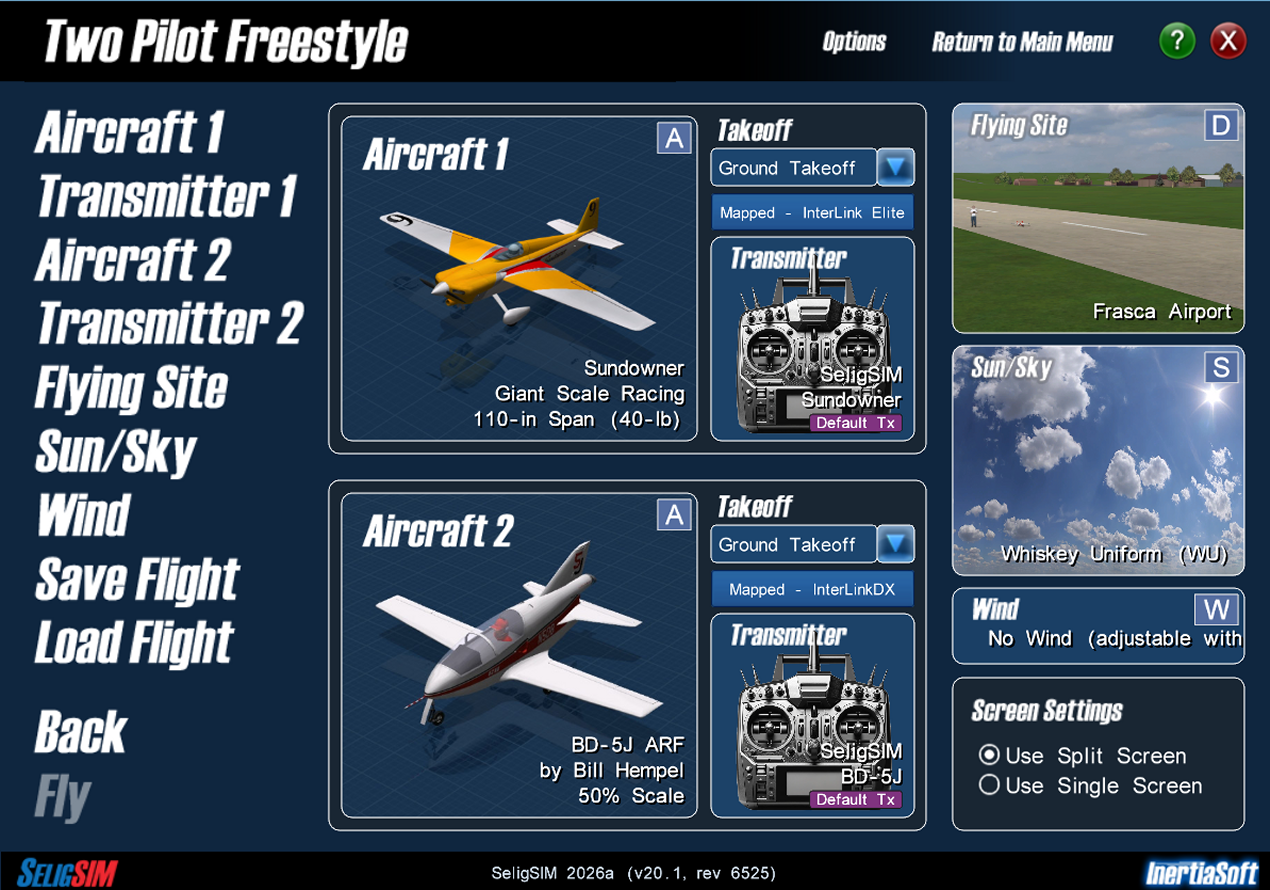
Two controllers, one per pilot. Aircraft 1 uses “Mapped - InterLink Elite” and Aircraft 2 uses “Mapped - InterLinkDX”, each with its airplane’s default transmitter.
A second option would be to select a Free Flight controller for one or both of the aircraft.
The third option would be to select the same controller. To try that, select the same interface and then also “Unit 1” for the second pilot controller. An example is shown below with identical aircraft also selected. With this setup, clicking Fly to launch a Flight Session will result in two aircraft being flown by the same controller, i.e., a single pilot flying two aircraft in formation flight. The formation flight will happen as long as there is no turbulence and both aircraft land and takeoff from a perfectly flat runway, e.g., Frasca Airport runway. A screenshot of the Flight Session is below. (At some point during a flight, the perfect formation flight will break down due to numerical round off errors and some stochastics included in the simulation physics.)

Fly Screen: Two Pilot Freestyle with Identical Selections (while choosing “Unit 1” for the second pilot’s interface).

Flight Session with two identical aircraft.
Camera Views, Reset, and other Keyboard Controls
To change the view for Pilot 1, use the camera keys F1 through F12 . To change the view for Pilot 2, hold Right Shift (the
Pilot 2 modifier) with the camera keys, i.e., Right Shift +
F1 through Right Shift + F12 . Right Shift
makes a key apply to the second pilot in two-pilot mode, and bare
keys drive Pilot 1. For instance, to reset Aircraft 1 use
Spacebar and to reset Aircraft 2 use Right Shift +
Spacebar . The menu bar adds a
Pilot 2 menu in a two pilot session with all of these.
Physics Calculations for Two Aircraft
Because this setup must calculate the physics of both aircraft, the simulator may run more slowly on your computer. If your computer is powerful enough, you will not notice any difference vs flying with only one aircraft physics calculation.
Flying
Click Fly to start flying and Esc to exit. Most widgets and
tools apply to Aircraft 1. The Flight Manual and Airplane
Specifications panels have Pilot 2 forms, Right Shift + I
and Right Shift + KP /.