2. Getting Started: Part II
With your controller set up per Part I, here is how to launch the sim and fly. In short:
If you mapped your controller in the Mapping window (Approach 1): Plug in your controller, start SeligSIM, and click Single Pilot -> Freestyle. Your USB interface is already “Mapped - <device>” and already calibrated. Click Fly.
If you mapped in your transmitter, or use the FS One V1 TacCon (Approach 2): Plug in your transmitter, start SeligSIM, and on the Single Pilot -> Freestyle window select your transmitter’s USB name (or the V1 interface name) as the USB interface. Click the transmitter and calibrate. The red “NOT CALIBRATED” banner goes away. Then Fly.
If you use an FS One V2 interface (Approach 3): Plug in your interface first and confirm it works in the Windows Game Controller gadget. Start SeligSIM, select the FS One V2 interface, select the “Universal Tx”, and calibrate before you fly.
When you calibrate, follow the on-screen prompts. Your goal is to move your controls so that they move the red sliders in the sim. If you are using all 8 axes, you should be able to move all 8 red sliders, each in turn.
After calibrating, check that your inputs follow the standard axes order (Part I). Apply full inputs in the directions indicated.
When you select an airplane, the sim automatically selects the correct transmitter. You do not select a Tx yourself, unless you want one of your own edited Tx setups.
When you click Fly to start a Flight Session, SeligSIM makes extensive use of the keyboard. Nearly all keys do something during a Flight Session. A menu bar at the top of the screen lists them. The menu screens have keys too, for the quick searches and the selection windows, described under Running SeligSIM below.
To exit a Flight Session, press the
Esckey once (upper left keyboard key).To exit the sim from any selection screen, press
Escor click the “X” in the window’s top-right corner.To see what controls each airplane uses, see the Flight Manual. Or go to the Aircraft Selection screen, select an airplane, and click the Flight Manual button on the left. That takes you directly to the Flight Manual for that airplane.
For help while running SeligSIM, click the “?” button on any screen. It opens the online User Manual at the page for your current screen.
Installing SeligSIM also installs the SeligSIM Power Tools program. Running it unlocks additional features. Power Tools is optional, but useful enough that eventually it may be how you routinely launch the sim.
Disconnect Other USB Interfaces
For simplicity, disconnect all USB interfaces except the one you are going to use. Have your controller plugged in before you start SeligSIM.
Start SeligSIM
Start the sim by clicking the SeligSIM icon on the desktop or by selecting it from the Start menu. The Main Menu is then displayed.
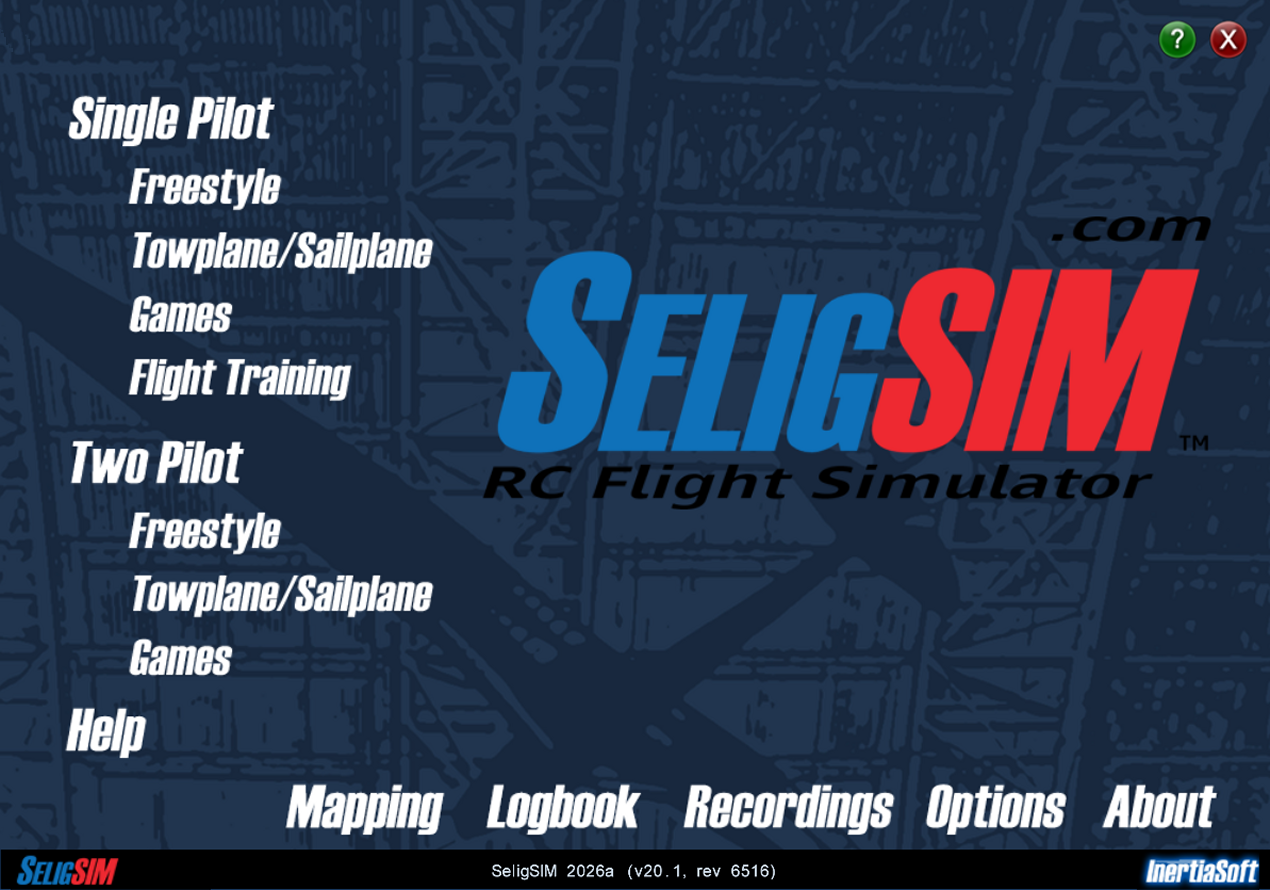
The Main Menu shows the Single Pilot categories, the Two Pilot categories, and Help. Along the bottom are Mapping (controller setup, see Part I), Logbook, Recordings, Options, and About. In the upper right are the Help and Quit buttons.
2.1. Calibrating Your Controller
From the Main Menu, click Single Pilot -> Freestyle, which takes you to the Fly Screen.
2.1.1. Selections
USB Interface Selection: On the Single Pilot Freestyle window, click on the USB Interface name (blue button) to select the interface that you are using. If you mapped your controller in the Mapping window, “Mapped - <device>” is already selected.
Aircraft Selection: The Alpha 40 trainer is the default airplane.
Click on the 3D rotating Alpha 40 airplane. It will
take you to the Aircraft Selection window. On that window, click on
the OK button on the lower left to return to the Single Pilot
Freestyle window, leaving the Alpha 40 airplane selected.
2.1.2. Transmitter Is Automatically Selected
When you select an airplane, the sim automatically selects the correct transmitter (“software radio” with rates, expos, and flight modes). You do not need to enter the Transmitter Selection window when you pick a new airplane to fly.
On a Fly Screen, the transmitter icon should have the name of your airplane on it. If not, click on the airplane (Aircraft Selection window), reselect the airplane, and return. The name of your airplane should then be on the icon (the name may differ slightly).
If you do select a different type of transmitter, e.g., a “Free Flight” controller, get back to the normal transmitter by reselecting the airplane, or by clicking the purple Select Default Transmitter button in the Transmitter Selection window.
A “Transmitter” in SeligSIM is the “Software Radio” for the airplane you have selected. It includes the flight modes and any mixes, expos, and rates for that airplane. To learn more, see the chapter on transmitters.
If you have created, edited, and saved a custom transmitter for an airplane, select it yourself. The automatic selection picks the airplane’s default transmitter.
2.1.3. Two Transmitter Icons
Case 1: You selected a Mapped device, an FS One V1 interface, or your own Tx’s USB name:
Your page should look like the next screen shot. The transmitter icon shows the black controller picture and is named after the airplane. For a Mapped device, the icon is already calibrated. For the other two, it shows “NOT CALIBRATED” over the transmitter icon until you calibrate.
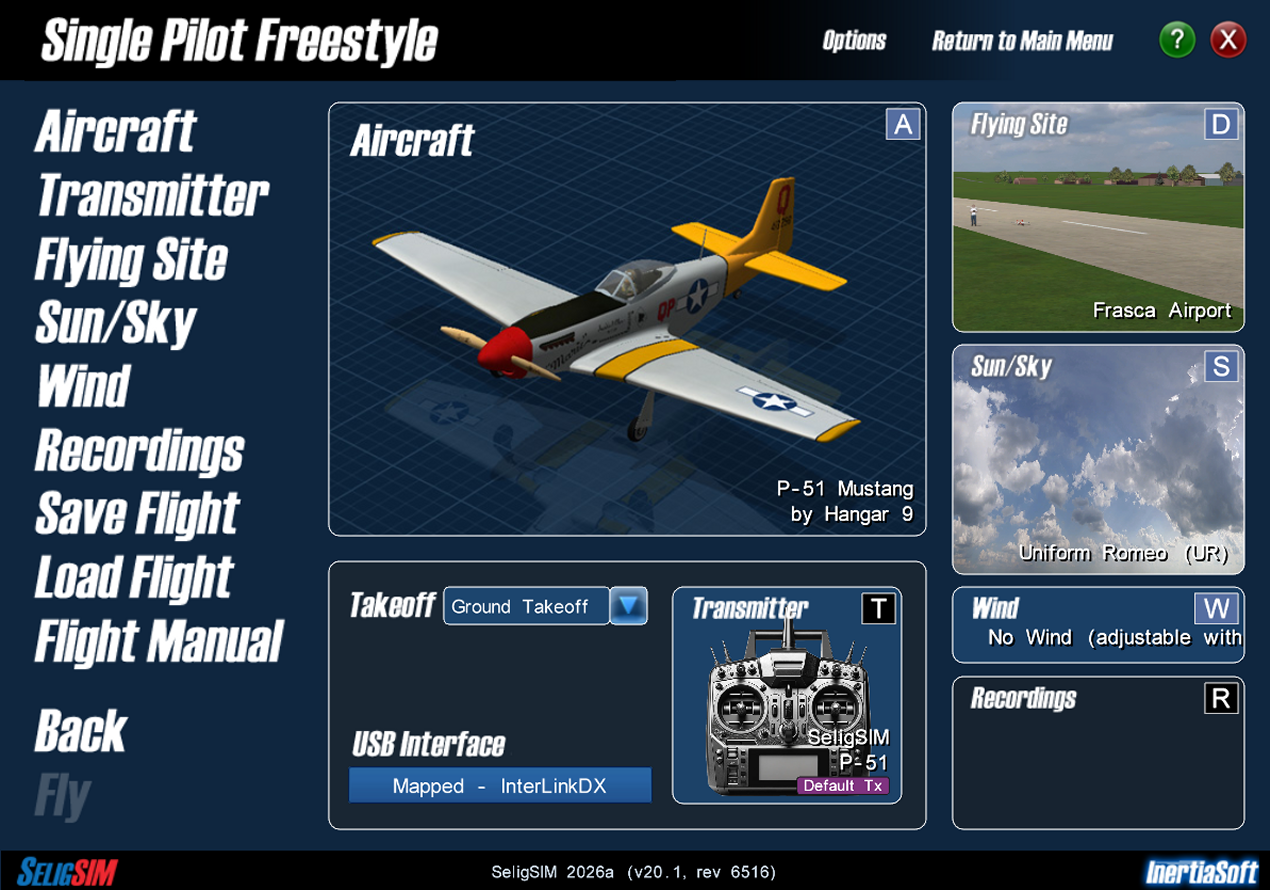
Fly Screen for a “Mapped - <device>” interface. The same Tx icon style applies to an FS One V1 interface or your transmitter’s own USB interface.
Case 2: You selected an FS One V2 Interface:
If you are using a V2 interface, the page should look like the second screen shot. The transmitter icon is the silver gray “Universal Tx.” It shows “NOT CALIBRATED” over the transmitter icon until you calibrate. Calibrate needs the “Universal Tx” selected. With any other radio highlighted it says “Select Universal Tx First”.

Fly Screen for an FS One V2 interface selection.
For owners and users of a V2 interface: What if you see something different?
If you do not see the proper “Universal Tx” transmitter icon described above, click on the airplane and then OK to return to the Fly Screen. The proper “Universal Tx” icon should then be selected automatically.
2.1.4. Calibration
Mapped device (Approach 1): You calibrated in the Mapping window, and that is the calibration. To recalibrate, return to the Mapping window and click Calibrate again.
For the other two approaches, the sim gives step-by-step instructions for calibrating, depending on your USB interface type. Start by clicking on the transmitter icon. Then on the left, click Calibrate. Follow the pop-up instructions. If you miss a step, finish and start over. When you successfully calibrate, the sliders in SeligSIM should match the standard axes order in Part I (the blue SeligSIM axes column).
Some details are worth noting:
Your own Tx’s USB name (Approach 2), or an FS One V1 interface:
Using all 8 axes: Move all red highlighted axes when prompted, each in turn.
Using fewer than 8 axes: The axes you have not set up can be skipped during calibration. Their functions are then controlled by keyboard keys as described in the Flight Manual. The Flight Manual panel (
Left Shift+Iwhile flying) shows the controls for your airplane and controller, keys included where they apply.Resets: Where Reset-To-Home and Reset-In-Place are on one 3-position switch, be sure to reach both ends of the switch when prompted to calibrate the Resets axis, so that the axis covers the full low/middle/high range. If you skip one end, the sim may constantly reset when you fly (the airplane will not move). And it is easy to leave that switch in a reset position (high or low, not the middle). Flip the switch to the middle to get out of a constant reset.
If you cannot calibrate the reset axis properly (a constant reset condition), you can disable the controller reset function. Run SeligSIM Power Tools and find the section Controller Options. Check the box “Disable Controller Reset”. Use the keyboard to reset (
SpacebarandUkey), or in the sim’s Options window, use “Auto-Reset after Crash”.
FS One V2 Interface (Approach 3):
The calibration instructions follow a different pattern and are simpler. When you click to finish, the calibration information is saved to your PC and also copied into the memory of the V2 USB interface.
Recalibrate
If the controller is not responding as you expect, recalibrate. If questions persist, review your axes order.
2.2. Running SeligSIM
Before you fly, the Single Pilot Freestyle window (a Fly Screen) has buttons to make selections for your flight, such as:
Aircraft: Airplane.
Transmitter: Transmitters, mainly used for calibrating.
Flying Site: Panorama or 3D fields.
Sun/Sky: Skies for 3D fields.
Wind: Steady wind, turbulence/gusts, thermals, wind shear for dynamic soaring.
Recordings: Recorded flights to playback while flying.
Takeoff Options: Ground, hand launch, hi-start, or winch.
You do not have to click through every one of these. Every pane on
the Fly Screen has a key. Press A for airplanes, D for
flying sites, S for sun/sky, or W for winds, and a quick
search opens. Type a few letters of the name, and the list narrows as
you type. T opens Transmitter Selection, R the Recordings
window, and once you have clicked a pane, F opens the quick search
for that pane. Enter is Fly, so from a cold start Enter,
Enter takes you into a flight. Press and release Alt and
small labels appear beside everything reachable from the keyboard.
The things you flew most recently are easy to find again. A Recent
category leads the aircraft, flying site, sky, and transmitter
dropdowns, in amber, and in the quick search dialogs the recently
selected items are listed in amber too.
Beware: The volume may be too high. If you need to lower the volume, you can do that from Options | Sound/Music or adjust your speakers directly.
To fly, click on Fly. The loading pane will show the progress bar.
When that finishes, you should see the fly window with your airplane
ready to fly. If you selected “Hand Launch”, “Hi-Start”, or “Winch” as the takeoff method,
launch by pressing the
Spacebar .
You can save your favorite selections by clicking the Save Flight button. Then next time, you can load the same selections with the Load Flight button. Using these save/load buttons can be handy if you fly in many different scenarios.
To learn more about your selected airplane, e.g., control setup for the airplane, click on the Flight Manual button on the left side of the Fly Screen.
Need help on one of the screens? Click the green “?” button at the top of the window. It will take you directly to the relevant section of the online User Manual for your current simulator screen.
2.3. Using Keys while Flying
To change your view (camera), press function keys ( F1 , F2 ,
etc.). The F1 camera key is the normal view from the ground. Key F5 will follow
the airplane. The F8 key has FPV-style views attached to the airplane. Press these F keys
multiple times to cycle all the way through all the cameras assigned to
each key. There are over 75 specialized camera views (cameras)
available via all function keys combined.
Print out and use SeligSIM Key Commands to
interact with the sim while you fly. For example, press the P key
to pause the simulation. To unpause, press P again.
Press the / key to open the Keyboard Shortcuts window while
flying (think “?” since “/” and “?” share the same key). Type a word
to filter the list. Press / or Esc to close it.
Toggle the E key to show/hide the on-screen Transmitter Display.
Almost all keys on your keyboard perform some function while flying,
and the menu bar at the top of the screen lists them.
2.4. Resetting and Quitting
To quit flying and return to the Single Pilot Freestyle menu, press the Esc key once on
your keyboard (upper left key on your keyboard, see the
keymap card). Pressing Esc again will
quit SeligSIM.
If you set up axis 2 (second from last in the standard axes order), then that controls the resets. With a 3-position switch, use the middle position to fly, and switch it high or low for Reset-To-Home or Reset-In-Place.
If you are using the TacCon controller from V1, you can use the
Reset-To-Home (“ResetPlus”) button on the controller (lower left) to reset to the
starting point or the Reset-In-Place button (upper left) to reset the
airplane at its current location after a crash. Alternatively, you can
also press the Spacebar (Reset-To-Home) or U
(Reset-In-Place) key on the keyboard to reset the airplane.
2.5. Flight Manual
To see how your airplane controls, see the Flight Manual.
2.6. Setup Tips
Some specific settings are recommended.
Run the simulator in auto fullscreen mode for normal flying. Select Options, then Video to see the current settings and options. However, depending on your computer, SeligSIM may run better (or only) in one of the other two modes: Manual Fullscreen or Windowed. If running at fullscreen resolution, all modes should be equivalent, but on some systems the performance and behavior is not equivalent. Test all methods to see what works best for your computer setup.
For more visual realism with all-around everyday kind of flying, use Lagged views (the default install setting for the
F1camera view). Select Options, then General (see below) and choose a Lagged view for the primary camera. A lagged camera view slightly lags the view relative to the airplane and produces more fluid visuals. In some situations, such as pylon racing, the non-lagged views, called Perfect views (the default install setting forF2camera view ), are often favored by pylon racers when the pilot’s eyepoint is locked onto the airplane.Select Options, then Graphics 2. For best graphics, keep all sliders to the maximum settings (sliders to right). If you are using a less capable graphics card (old or HD integrated graphics), you might achieve a higher frame rate at the lower settings (sliders to left).
